Posts Tagged ‘Coil’

Quadrifilar Coil

November 17, 2014

As I am editing my second edition of volume one and the second volume, I am finding small errors that need to be corrected. The picture on my blog Multifilar can easily be replaced, but my book has been in print for a year, so I am including the file replacement and an additional file that will be in my second volume. The second picture has a very important visual aid for those who are designing transformers or resonant circuits, it has the layout so you can see the mutual inductance of each winding, a very simple but effective aid.

Here is the replacement file:

Quadri Filar Coil options V#2Here is the additional file:

Quadrifilar Mutual Coils


Tesla Coil Conversations

April 4, 2014

Tesla Coil Conversations

by Arto Juhani Heino (c) 2014

Memories of Tesla and 1000 other coils

Arto and Fred standing in front of a Large Cylindrical Tesla Coil, in the workshop and home laboratory of Arto Heino:

Arto: “Stick your hand in at the base of that big Tesla coil and tell me if the voltage is big”, he said while grinning wryly.
Fred: “No way man, I can see the high voltage at the top, which means I might die, because it is the current that kills”, jumps back while he exclaims, being puzzled by his own instinctive understanding.
Arto: “Well said, how did you figure that out?”
Fred: “Just hanging around you, by watching how you avoid touching the primary and any part down at the base of the coil”

He looks around the workshop and sees lots of different balls sizes and some toroids, he can see that they attach to the top of the Tesla coil.

Fred: “Why have you got that ball on top?”
Arto: “To store the reactive charge into the dielectric around the ball while the dielectric component is reflected at the anti-node and will be transformed back to the magnetic component at the base which is reflected by the node, all this happens during each cycle at its natural frequency and is the due to it’s standing wave resonant structure, which relates to the length of the wire being the quarter of the wave length of its natural frequency, while also adhering to the balance of two components the inductive which is the magnetic component and the capacitive which is the dielectric component at the same frequency,”
Arto: “To simplify they act as polar opposites both have reflections at the opposite node, Magnetic/Node, Dielectric/Anti-node, so simple no complicated explanation necessary. This sort of knowledge makes theoretical and mathematical people nervous.”
Fred: “Wow that changes a my way of thinking, they never told me that at school”
Arto: “I understand, sometimes understanding something is not easy, you have to be able to fail and disappoint yourself to get past those prejudices”

Now they are standing in front of a bench with lots of coils, capacitors and power supplies:

Fred: “What’s with that other coil, there is no sparks or ball?”
Arto: “Oh that is a half-wave system, that doesn’t use a reactive transformation like the Tesla Coil. It just swaps between the Voltage/Current transform, but in a nodal resonant fashion, by the length of the wire being half the length of the wave length of its natural frequency.”

Fred points to another fancy coil on the bench:

Fred: “That one their has a ball at either end, and a thick primary in the center.”
Arto: “That is another half wave system, but this one also has capacitive reactive exchanges at either end, it acts like two Tesla coils joined at the base.”

Fred walks over and flicks the switch that is labelled “LC circuit”.

Fred: “Then what’s this other one here, it has a Capacitor and Coil, but it sparks are small”
Arto: “That is similar to the Big Tesla Coil, but it only resonates between the reactive components not the nodal structure, the wire length only relates to the amount of turns and an increase in inductance”
Fred: “Oh so you are saying that resonance can be number of exchange devices”

Fred picks up a long cylindrical neon tube and walks over to the Tesla coil:

Fred: “Check out that Neon light when you bring it to the top of the coil”
Arto: “Yes, that is the high charge density around the top capacitance, it affects the neon inside the tube and makes it fluoresce, that’s why they call it a florescent tube”
Fred: “The light is not bright down here”
Arto: “That is because the alternating magnetic component does not affect the neon in the tube, and the dielectric charge density is low just like the voltage but having said that the current density is high”

Now they are standing in front of a industrial neon light fitting, using a multimeter:

Fred: “How come when I measure the small neon transformer here it only shows 120 volts”
Arto: “That’s the voltage just to maintain the florescent activity in the tube, the ignition circuit starts the florescence and is part of the same transformer, it just creates a inductive high voltage charge when the starter switches”

“It is not hard to teach people to look but its takes a lifetime to educate those to see.” – Arto Heino

This could be one  my last post on WordPress, due to slow sales of my book and lack of support for my work, I will be moving my previous posts and they will be only available as PDFs, sorry I given a lot of my work for free and do not know if I can continue with this blog, good luck to all the experimenters and researchers. Regards Arto.

Live Interview

December 14, 2013

Hi Fellow researchers ,

Adam Bull has released a 4 Hr interview on Youtube, it is informal and free flowing, about my book “Talking to the Birds”.

Here is the Link-

Here is the Press Release:

After many years of research, personal discovery and seeing the world through the perception of an Artist, one who by his very nature must understand something very deeply before he renders its likeness, Arto Heino has released his first volume “Talking to the Birds”. The subjects covered in his book are as varied as his pallet, he shows a different perspective about each subject he studies.  Volume I, A compilation of his best works, you will see the many different hats he wears as he sifts through a broad spectrum of knowledge with a profound insight into several pieces of hidden information ignored by most other researchers.

To understand the author of this work is to peer into layers of understanding that have not been lifted in most researchers lifetime. In the chapter on Archeo-Astronomy Arto looks at some of the basic assumptions about the nature of man’s history and came to some simple conclusions, the evidence he uses is not a rehash of another theory but new and startling revelations about the cyclic nature of our consciousness. The artist and writer Arto Heino shines the light where few others have on past ancient artifacts and current sciences that should give you a new way to see the past.

As a young child, Arto found meaning in natures chaos and his deep connection to some of its hidden attributes long before he articulated his understanding to others. Books gave him one of the tools to peer into history and find those who could help him guide his vision, great artists like Leonardo Da Vinci took him to a simpler way of personal scientific and artistic discovery. To show some of what he has learned from the master he gives a brief insight into one of Da Vinci’s more famous artworks.

The lure of electricity is never far from his thoughts, he has several chapters that deal with Electronics, Invention and Machines they cover some of the most important works of Nikola Tesla. Arto shows his own artistic method of understanding the circuits of Tesla and removes a lot of the mystery that surround his work. The circuit models by Arto are more like artworks that have a landscape of parameters and clues to other possibilities. He pries into some of the mystery that surrounds the work of Lester Hendershot, Don Smith and Henry Moray, giving  new insights that could help to guide other researchers to new conclusions.

The nature of the geometric abstraction is not just pretty patterns like most modern conveyors, to Arto this is where you can find a deeper connection to the sciences. He sees a simple form such as a triangle as a new beginning to a new and non-complex form of mathematics, Quantum Arithmetic. As he implies he is only expanding on something that the geometers have tried to bury, Arto shows some of his studies in Quantum Arithmetic and the expansion of a new type of geometric discovery, where he applies it to the Giza pyramid, the Kings chamber and an Egyptian artifact that has alluded many archaeologists and geometers for the past 80 years.

The surprise in the book is not just his varied perspective of technology but in one chapter Arto lifts the surface off our modern paradigm, he includes some of his more popular cartoon images to highlight the high paced and disturbing reductions of our elite. Arto as an artist and a musician gives those inclined an interesting group of studies.

If you would like a copy of the book –

http://www.amazon.com/gp/product/1876406038/ref=as_li_qf_sp_asin_il_tl?ie=UTF8&camp=1789&creative=9325&creativeASIN=1876406038&linkCode=as2&tag=artosrend-20

Also Available from –

https://www.solomon-books.com/

Magic Square Coil Technology

June 5, 2013

I have decided to make a new blog rather than updating an older one, refer to https://artojh.wordpress.com/2012/08/24/multi-filar-coils/. I would like to thank Andy, he  has prompted me to finish my chapter on coil geometry, with a new heading of Magic Square Coil Form. Back in 1996 I was working hard on winding many stator coils for the Robert Adams pulse motor designs, when I realized the few coils I wound in bifilar geometries seem to function with non linear results. This is when I discovered the varieties of subtle refinements that could be engineered into a basic system, that can give  measurable increments of control over the energy storage of the coil while it is pulsed.

Estored =1/2 * L* I^2 = Energy in Joules stored in the Inductance

Estored = 1/2 * C * V^2 = Energy in Joules stored in the Capacitance

I chose the Magic Square of Four as the prototype for the coils design, refer to the first diagram that reveals my logic in a simplified form. The left stator coil is the left half of the Magic Square, this is how magic squares work mirror reflections that balance the numeric relationships to create harmony, where the wiring is now the pathways that have both Inductance and Capacitance is the same internal geometry as  a magic square, the right stator is now the right side of the magic square.

AdamsCoilsc3

To understand the significance of creating chaotic systems that the outcomes  cannot be easily predicted, is to look into the heart of a living organism. The number of square four arrangements  available to the constructor becomes 880  basic Magic Square Four patterns.  If you expand the system you could have 4 coils each with a complete magic square arrangement giving you millions of 880 combinations. The design parameters can be expanded to include odd squares and  very large magic squares. The coils could also be split into the columns and rows giving you say 5 coils each with a in 5 and out 5 winding scheme, this will give you 25 separate wires that give you a square 5 arrangement.

The main criteria for any success is to keep all wires coming from the stators the same length and short as possible, a circuit board design would keep any stray Inductance and Capacitance to a minimum. A small circuit board could be at both ends of the stator with holes matching the wire ends and another attached between the stators, where you could mount a patch board or a special wire coil arrangement that Andy suggested. The environmental energy that exists in a chaotic form surrounds every object, a tumult of electrostatic, EM radiation , heat, dielectric charge fields and magnetism, this energy is not available to be absorbed into the circuit unless we can create a couple to its random behavior, and make a gate so the circuit can make use of it. This is the basis of a natural system based on natures gift to humanity Magic Squares, they are but discoveries of a natural system of numbers that can be translated in many different ways. The chaotic nature of magic squares gives you the invisible harmonic coupling  that needs to exist in a cyclic  system of energy exchange, the gating can now be engineered in the form of magic squares.

Here are the latest additions to help those who want to explore unknown territory. Regards Arto

AdamsCoilsd4

This next diagram should help you expand the possibilities of the simple methods I have inaugurated .

MultiFilarFlatCoilMagic1I will update this blog with any new information and tests. Regards Arto

http://www.amazon.com/gp/product/1876406038/ref=as_li_qf_sp_asin_il_tl?ie=UTF8&camp=1789&creative=9325&creativeASIN=1876406038&linkCode=as2&tag=artosrend-20


The Adams Motor

September 13, 2012

In 1986 I was designing some unique colour-music art (Synesthesia) and looking at ways to put this into electronics using leds, lasers, cathode ray tubes or computer programs, this led me to designing a colour organ that was fully integrated with audio correlation to the harmonic contents of the sound as well. I decided to apply for a patent and went to the patent office to do a search for similar devices.

During the search I listed a few names and previous attempts, which went all the way back to 1890’s, while I was their I also looked for new developments in electric motors, this was the moment I found the Adams motor and noted the inventor was from New Zealand and he had patented his invention in 1969. I immediately concluded this simple design would be very efficient and unique as all the poles were of the same polarity, this was duly noted and I pressed on with other matters at the patent office. Amazingly enough I did end up the the Edison Electric offices where I explained the basic tenants and principles of this colour-organ to a few very attentive engineers.  Later in that month I met with one of the patent holders for one of the colour-organs who just happen to be an artist as well and lived in Sydney.  Before the month was out I wrote to the Sharp corporation and presented my findings and possible applications on my invention, they wrote back to me with a generous tone and kept me in mind for any future developments in this direction.

A brief description of my colour organ – Frequency correlated harmonic fourier separation to colour chroma addition translated to voltage steps controlling electron charge amplifiers  creating a proportional light intensity and equated colour area and location in the visual field, the resultant beam or electric display (Tesla coils with or without  gas enveloped top loads, closed electron tube/ phosphor display, optical wall/3D display, Holographic multi- projectors, laser projectors) would modulate with sensitive modes that equated to the overall mood and flowing structure of the music based on translating electronics. Some of these ideas have been used by others in recent years, due to the advent of readily available electronic component modules.

This chance study of the Adams motor at the patent office was originally prompted by a childhood dream of a free running motor that collected the energy from the universe to power it. This reoccurring dream was in the late 60’s when I was building crystal radio’s, high voltage coils, transistor circuits and single valve circuits.  This was the time I listened to Short and Long wave radio with my home made aerials picking up whistlers and other radio noise that I found by pointing my wire dishes at different portions of the sky and at different times of the day and night. I was about 12 at the time when a lot of these ideas about how these things operated occurred to me.

In early 1990’s I started compiling my various work on many subjects including motor design, when I was pleasantly surprised that Robert Adams published a ground breaking article in the Nexus magazine on his motor design. This was an exiting time as a lot of the backyard and professional engineers were collaborating and working on many new devices. At this time in Sydney there were group meetings and we were showing our current builds and exchanging information between members, the only problem was the new paradigm of over-unity engineering was not developed enough to handle the questions many members had. As always, I was the outsider who didn’t put faith in the current techno-babble of electrical engineering, being self taught in these matters, I relied on basic tenants of creating the equations from the evidence, not forcing the build to comply with the equations. This is what I gleaned from most of  the Scientists and Inventors of history mainly  Leonardo Da Vinci, Nicola Tesla and Victor Schauberger. In a desperate attempt to help my fellow builders I met with Robert Adams at the Sydney Nexus conference, from that moment on I  corresponded with Mr Adams a few times and sent him a few of my design sketches. I will include a copy of one of the letters I received from him, below.

Letter from Robert Adams to Arto Heino

The testing process of my build of the Adams motor was arduous and drawn out over a least 2-3 years, I had to learn many new skills and I developed an intuitive insight into this simple motor that goes beyond equations and engineering. The great help came from the generous group I was involved with at the time, I was loaned a oscilloscope, that is when the next phase of my journey began. I tried to convey the results to my fellow researchers and found they were closed minded about developing new equations that included open systems, I met with many and explained the tenants of true free energy, they turned to their university books and denounced anything that was not written in the science bibles. As I was not brainwashed in these matters, I could see their distress when I confronted their most hallowed beliefs of the system of modern science they were taught as sacrosanct, alas Einstein ruled. I am not a scientist or an engineer, I am an Artist from the school(mind set) of  Leonardo da Vinci and Walter Russel , therefore I am a natural scientist and observer of phenomenon, please allow me at least this modesty for my years of study and practical application .

I moved away from trying to convince others of the errors hidden in the equations and I allowed the natural curiosity and time for them to realize and discover it in there own time, the greatest teacher is ones own experience. This has been the legacy of Robert Adams, a man who spent a lifetime serving the system only to confront it head-on with its own  fallacies. Robert had been attacked on many occasions by the agents of a flawed science, only to be praised by those who have already awakened to the same dilemma  such as the notable scientist Harold Aspen. Their written legacy still exists for other to learn from.

I will not include in this blog the 400 odd tests that I performed as this would prove nothing, the tests were for me to understand the operations of the motor circuitry and look for environmental correlations. I have seen many people approach the design of the Adams motor with a sledge hammer, with stronger magnets, faster speeds, larger disks, bigger coils etc, this has always been to no avail as the basic understanding has been missed. This motor will run in a resonant fashion, to itself and the environment. This is the key, do not underestimate what Robert Adams tried to convey with his descriptions and explanations. Look at the  wave functions  of the whole solar system, day/night,  altitude,  atmospherics, terrulian currents, temperature, EM fog and geographic location before you make conclusions about how this simple motor operates. Energy is everywhere, tapping into this resource takes patience, observation, curiosity, creativity and sound scientific principles. Do not be led into a blind alley of dogmatic procedures that  avoid the hidden truth that we live in an OPEN system and energy is always available to be used through the correct gating mechanisms that we discover.

Here is a schematic of the Adams motor design as I have come to understand, I have not included all the equations required to build such a motor/gen, just the basic schematic I have revealed. The complete transcriptions and equations will be in my book “Talking to the Birds”, Regards Arto

The Adams Motor

The Adams Motor


http://www.amazon.com/Talking-Birds-Compilation-Studies-Artwork/dp/1876406038/ref=sr_1_11?s=books&ie=UTF8&qid=1384589298&sr=1-11&keywords=talking+to+the+birds


Multi-Filar Coils

August 24, 2012

While making observations of coil designs that have been used over the centuries, I noticed only those that showed some perceived useful results were kept in the arsenal of the scientists, the rest were either ignored or forgotten. There are two basic types and a 3rd being the combination:

1 Circular – Eg Solenoid, flat spiral,spherical, toroidal, mobius

2 Non-circular – Eg Basket weave, geometric, polyhedral, star forms, mobius

The circular types have 3 basic types  a resultant 4th and the unique 5th type:

1 Rings adding vertically –  Solenoid Coil

2 Rings expanding diametrically  – Flat spiral

3 Rings adding in a circular form – Toroidal

4 Rings adding vertically and/or diametrically and/or circular

a) Conical – differing sizes in both direction

b) Multilayer Solenoid – same sizes vertically + differing sizes diametrically

c) Multilayer Flat Spiral – same coils sizes vertically + adding vertically

d) Toroidal and Poloidal windings mixed sizes vertically + differing sizes diametrically

e) Spherical rotations windings mixed sizes radially + differing sizes diametrically

5 Winding folding into itself, creating a single surface  – all possible geometries – Mobuis

The shapes of coils are one aspect the other is the winding order and direction, thus creating multiple poles, cross coupling inductance, retarding or increasing both the inductance and the capacitance as the design requires, the addition of the mobius windings diversifies the basic options, this is where the art is at in 2012. A good example of combining many geometries and winding types is the:

Magnetic coil(1820 Hans Christian Oersted)

Faraday coil(1831 Micheal Faraday)

Henry coil(1831 Joesph Henry)

Induction coil(1836 Nickolas Callan)

Ruhmkorff coil(1851 Heinrich Ruhmkorff)

Helmholtz coil(1869 Herman von Helmholtz)

Maxwell coil(1873 James Maxwell)

Cook coil(1871 Daniel Cook)

Tesla coil 1/4 wave(1891 Nicola Tesla)

Tesla Flat coil(1890 Nicola Tesla)

Tesla Bifilar coil(1894 Nicola Tesla)

Hubbard coil(1918 Alfred Hubbard)

O’Leary Coil(1920 William O’Leary)

Hendershot coil(1928 Lester Hendershot)

Interceptor coil(1946 John Wiegand)

Tokamak coil(1950 Oleg Lavrentiev)

Stellartator coil(1950 Lyman Spitzer)

Smith coil(1952 Wilber Smith)

Fusor coil(1964 Philo Farnsworth)

Hooper coil(1968 William Hooper)

Rodin coil(1986 Marco Rodin)

Biaxial Poloid coil(1990 Bo Atkinson)

Tetra Helix coil(1991 Bo Atkinson)

Vortex coil(1992 Ken Gailey)

Double Helix coil(TM) (2007 AML)

Not to mention my own explorations in coil geometry with:

Mandela coil(1990 Arto Heino) – Page 55 – Link

Crown coil(1994/2011 Arto Heino) – Link

Infinty coil(1993/2011 Arto Heino) – Link

– and many toroidal/polyhedral mixtures that have been popping up regularly with names like the Star ship coil, Loohan coil, Polish coil,  Big Secret coil, some of these are marvels of artistry and human innovation.

Not to mention the many non inductive windings that are used as resistances. This has been looked at for at least 200 years, Nicola Tesla was one engineer/Scientist who’s original thinking left a legacy of numerous winding geometries he used to design his motors and coils,one of these is his Bifilar design. This design exposed a unique addition to the idea of combining the merits of both coil and capacitor without addition hardware contrivances, the anti-series winding nulls out self-inductance.

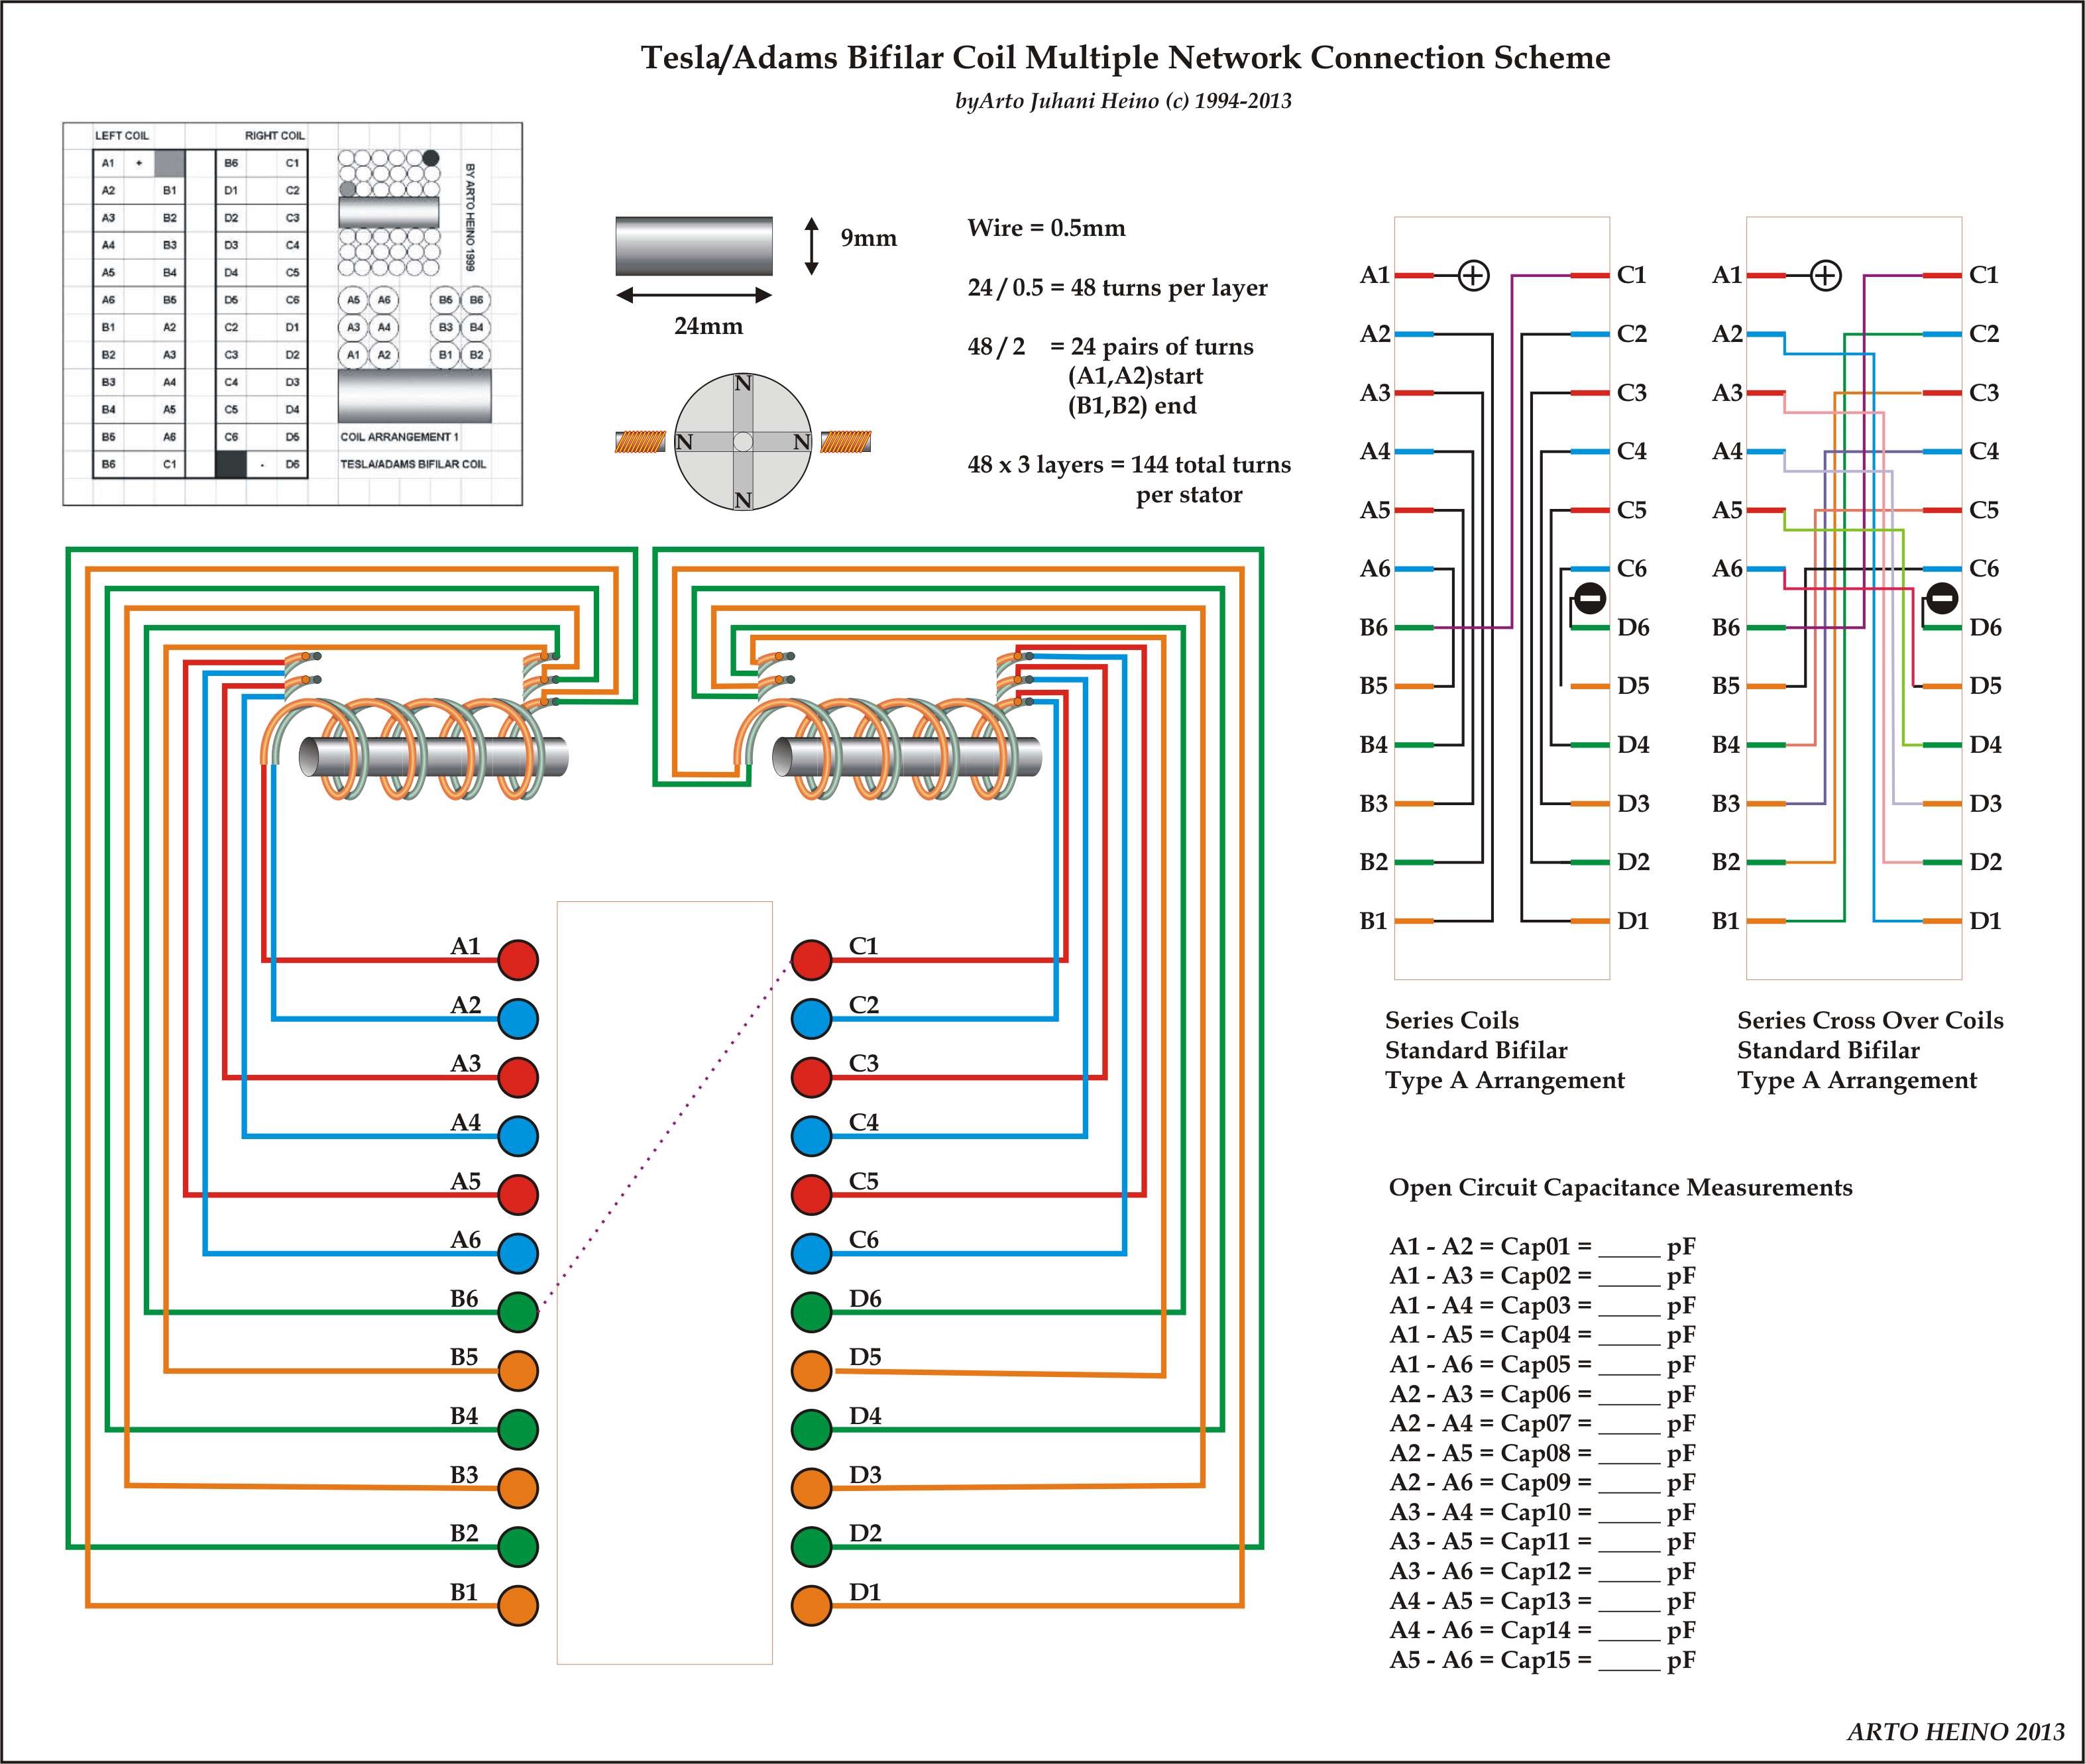
Nicola Tesla writes that a standard coil of 1000 turns with a potential of 100 volts across it will have a difference of 0.1 volt between turns.
100/1000 = 0.1
A similar bifilar coil will have a potential of 50 volts between turns.
100/2 = 50
In that the stored energy is a function of the square of the voltages, the ratio of energy in the bifilar to a standard coil will be
50^2/0.1^2 = 2500/0.01 = 250000
Which as stated by Tesla, “the energy stored is 250000 times greater than the standard coil!”

The storage of energy when pulsing a bifilar coil is n amount more than a standard solenoid/flat coil, as Tesla stated and gave you the formula to engineer this type of coil, we should be incorporating this simple idea into many everyday devices. I have drawn a few design methodologies that I hope will spur this well known innovation into more interesting directions.

These are basic bifilar solenoid configuration showing the capacitance between each winding. The windings can be rearranged in a different order to change the amount of induction and capacitance you put into the coil.  The winding below shows what can be done to rearrange the capacitive differential to increase the energy storage.

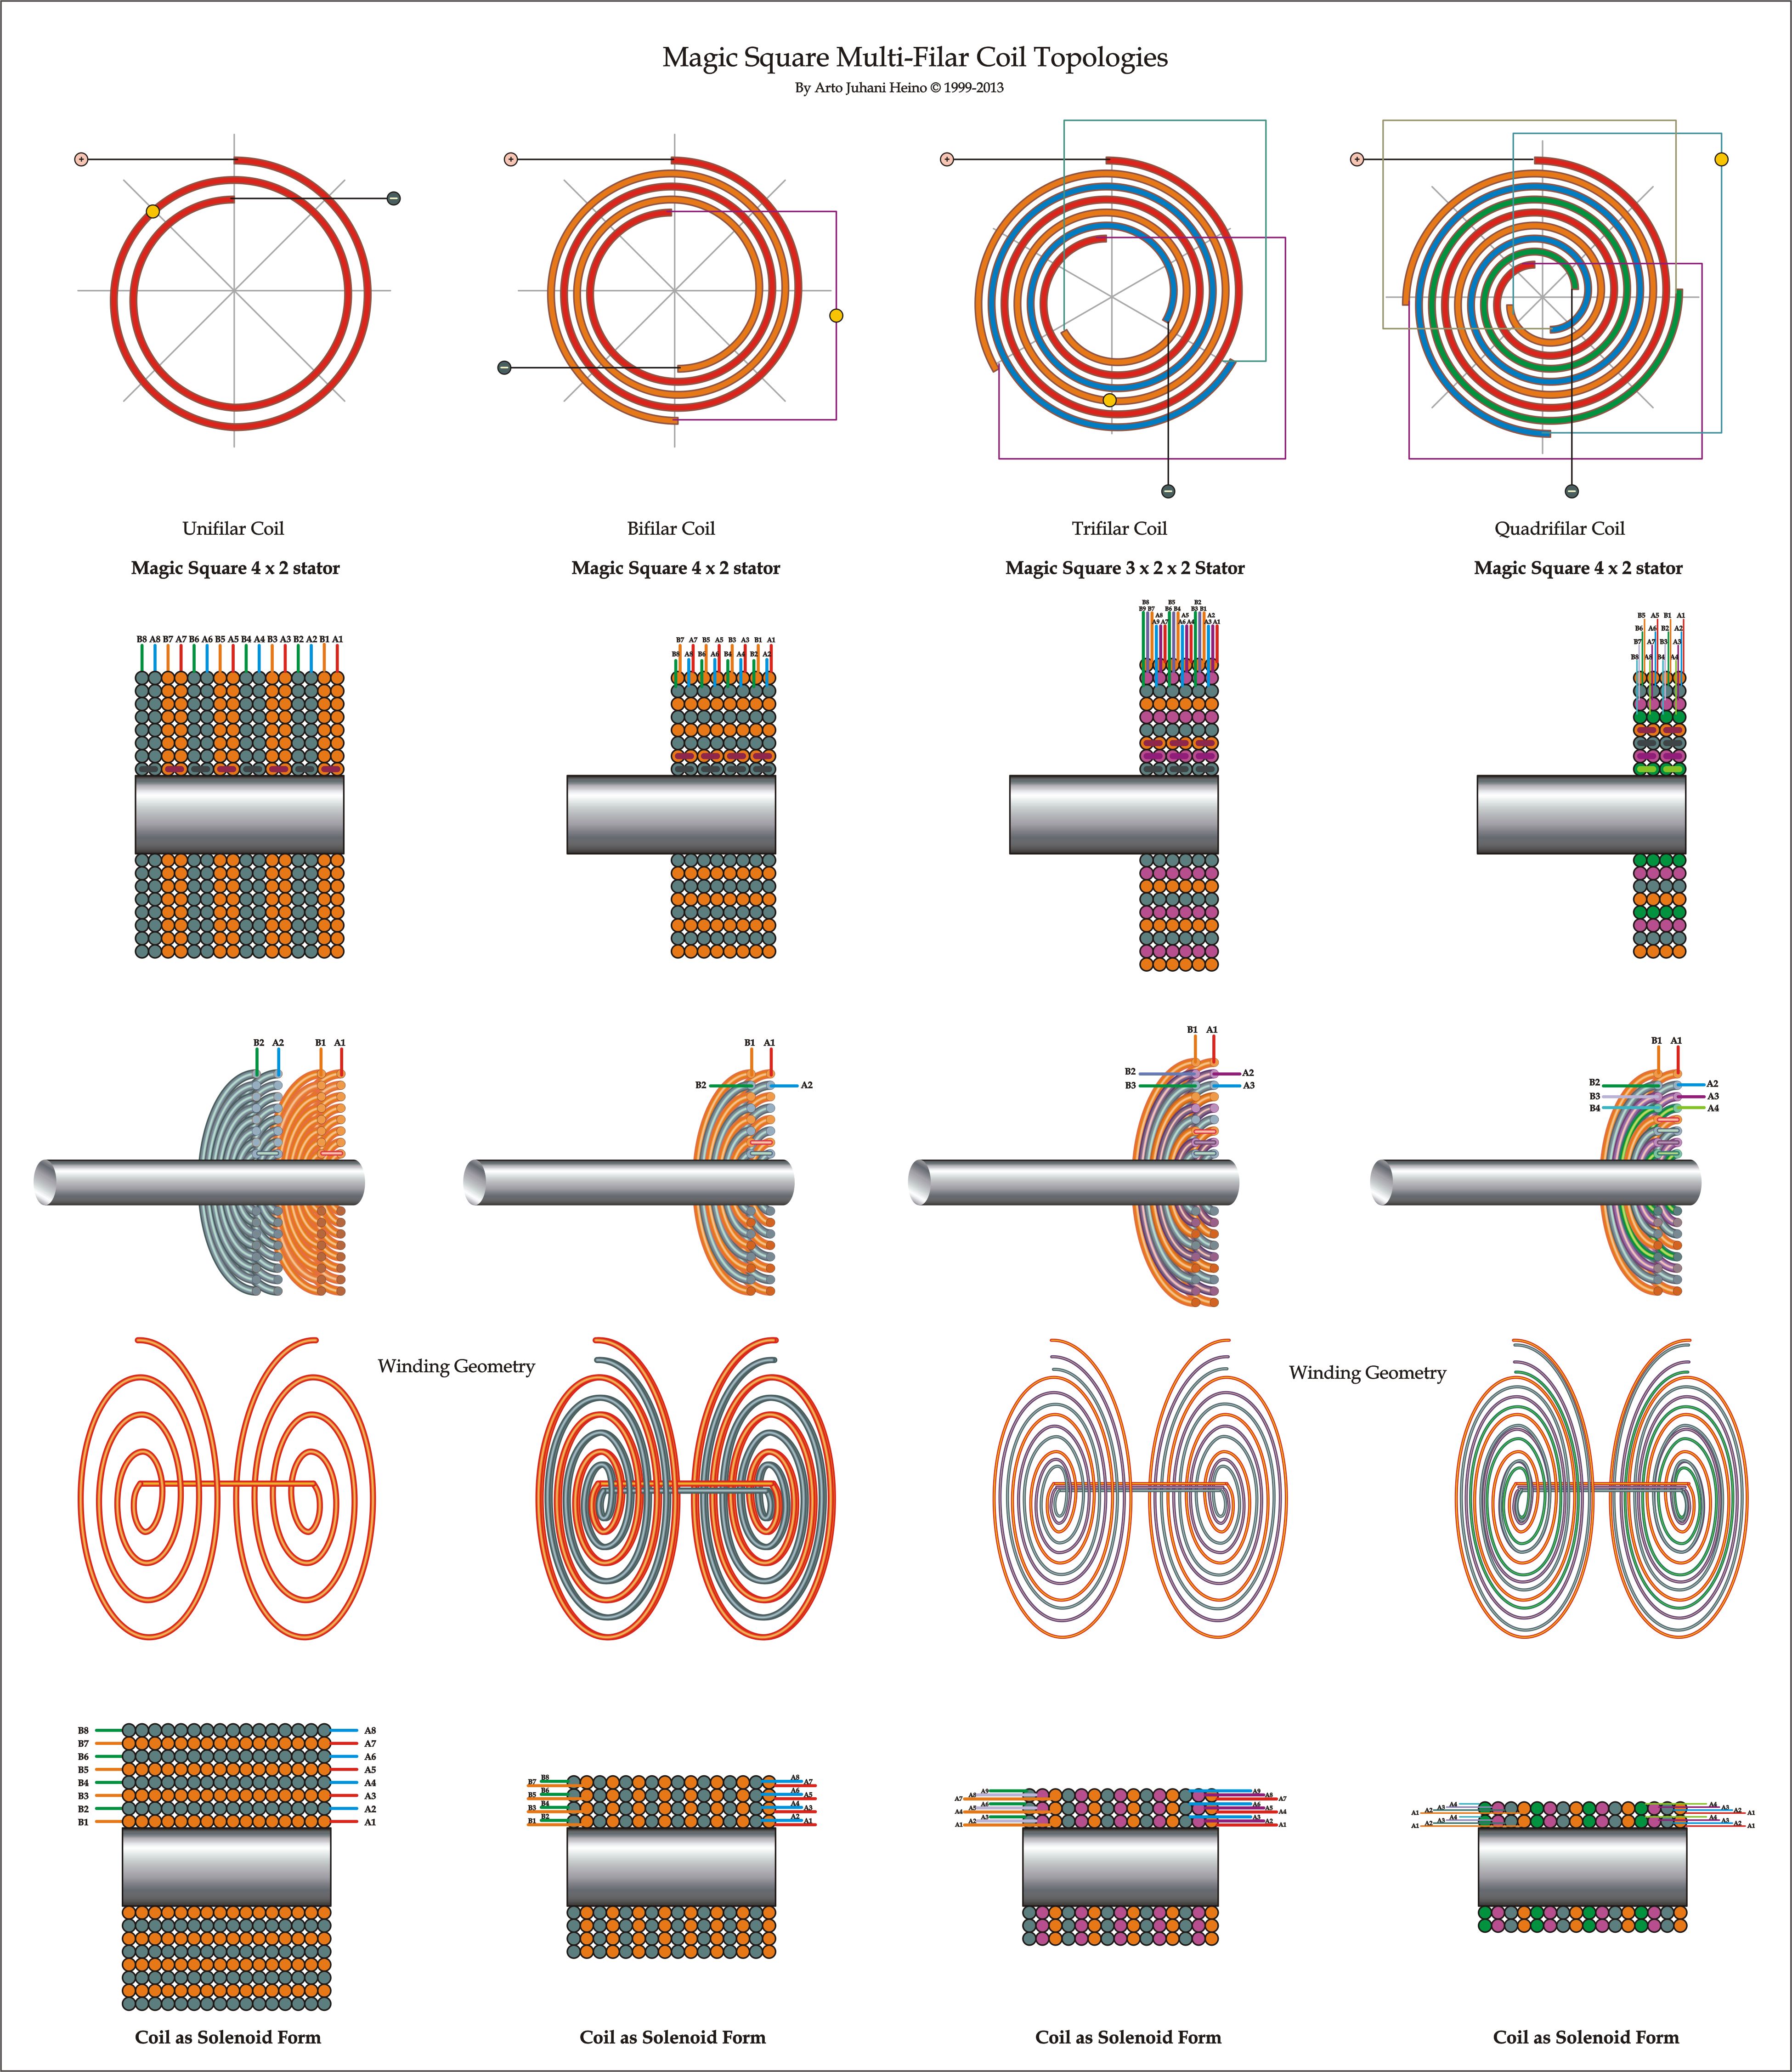
The graphic table below shows how many different arrangements that can be used with a Quadrifilar coil system, each will give a different result for the inductance, capacitance and its resonant frequency spectrum.

A great science/engineering project or University paper for someone would be to tabulate and analyze  each arrangement,  you might just get your doctorate on this.

The flat coil is a dimension less than the solenoid and a lot easier to redefine into  multi-filar arrangements.

The basic geometries involved in designing coils, transformers and bifilar systems must have a few design rules so the engineering of these items become straight forward and adaptable to the needs of the energy transformations. Here are a few simple systems that can be easily expanded and used creatively.

The cipher I am using here is:

B = Blue              R = Red

U = Upper          L = Lower

N = North           S = South      / is the upper part of the cross

E = East               W = West       \ is the upper part of the cross

The order of the letters is the order from the top to the bottom.

The order of the numbers is from the left to the right.

The first set is based on 2 simple loops. This will give you 8 different forms:

The next is the topology of a single loop of wire which loops on itself, like a bifilar or just a plain solenoid:

As you can see by these configurations, the standard engineering practice used in industry only use a small portion of these geometries. Now if you loop 2 coils as used in transformers you will see industry only apply 1 or 2 of these geometries in 98% of all transformers.

The fusing of  Adams motor and the Tesla bifilar coil was one of the first iterations that showed me the correctness of this approach by its exceptional efficiency.

Incorporating both bifilar and loop transformations as shown previously, you can begin to appreciate the transformations I have below to create a magic square coil, as originally shown on my Artoworld website in 1999.

Old photo from 1999

Most of the original readers of these documents never understood my topology in 1999, even though I built many of these coil constructs as stators for pulsed motors. The current breed of experimenter has less inhibitions to these  geometric forms. The first arrangement is the non-magic numeric sequence, just the same as if you wrap a standard solenoid.

Colimag4

The next diagram is the magic square arrangement, which utilizes the the pairing of the “17” as a magic square paring which translates to the bifilar pairing.

Below is the original stator coil I wound in 1999, it performed well and required high voltage(24v) and low current(0.001 amp).

I hope this small extract from my upcoming book “Talking with the Birds” will be helpful in any research you might be doing. Regards Arto

Here is  Link to a Multifilar Coil Manufacturer, called Custom Wire Technologies Inc. Give them a buzz they might help you, Regards Arto

https://customwiretech.com/

*** Update***

I have had a request to explain the Tesla/Adams Bifilar setup, here is a diagram that should make it transparent. The consequence of using this way of connecting coils will give you a multitude of possibilities for the experimenter to find interesting combinations ,  have fun regards Arto.

AdamsCoilsb2*** Update 2 *** 03-06-2013

Thanks to Andy I have added one more diagram to help decipher my Magic Square Coil arrangements.

AdamsCoilsc3

*** Update ***

Added the Spiral coil implementation.

AdamsCoilsd4For the continuation of this blog go to : https://artojh.wordpress.com/2013/06/05/magic-square-coil-technology/

Or buy my book at Amazon.com

http://www.amazon.com/gp/product/1876406038/ref=as_li_qf_sp_asin_il_tl?ie=UTF8&camp=1789&creative=9325&creativeASIN=1876406038&linkCode=as2&tag=artosrend-20

One-Time
Monthly
Yearly

If you would like to help my efforts in all my future posts, I would very much appreciate your donation.

Make a monthly donation

Make a yearly donation

Choose an amount

$5.00
$15.00
$100.00
$5.00
$15.00
$100.00
$5.00
$15.00
$100.00

Or enter a custom amount

$

Your contribution is appreciated.

Your contribution is appreciated.

Your contribution is appreciated.

DonateDonate monthlyDonate yearly

The Infinity Coil

August 4, 2012

When I was working on the many forms of the Robert Adams motor in the 1990’s , I was happy to fulfill the basic tenants of the original Robert Adams design. The clear revelations of a simple switched reluctance motor with parametric amplification factors that can go into resonance with itself and the larger environment gave me inspiration in the form of a double coil in the figure eight with two rotors running in opposite directions and two sets of pulse coils.

After many years I decided to return back to these designs as they merit greater experimentation. The original Infinity coils were two solenoids in parallel wound in a figure eight fashion, this would also work on two toroids stacked in parallel also adding the bifilar winding scheme, this became my final design as shown below.

As to the functionality of this coil, I put together a simple pulse circuit, that only uses a 0.5-3volt source and lights a MR16 3W light for about 10 hours beginning at 60% illumination, as shown below.

There is still more work that has been done on this arrangement as all relevant factors are notated in my up coming book ( “Talking with the Birds”) and have been explored to a greater degree than presented here. Regards Arto

Tesla’s Patent Revealed

May 29, 2012

TESLA PATENT 583,953

APPARATUS FOR PRODUCING CURRENTS OF HIGH FREQUENCY.

As quoted by Tesla in this patent,  “In the description of the invention is designed for converting a continuous or direct current into one of high frequency.” , this can be interpreted as using 120/240 AC to Battery/Rectified as the electrical power source.

This part is describing how he uses a large induction coil and a rotary commutator for his switching circuits to create his pulsed energy,  “I have employed a circuit of high self-induction connected with the mains from a suitable source of current and containing some form of circuit-controller for periodically interrupting it.

The following is very important as Tesla only used a commutator to switch and didn’t use the modern equivalents such as transistors and diodes.“Around the break or point of interruption I have arranged a condenser, into which the circuit discharges when interrupted, and this condenser is in turn made to discharge through a circuit containing the primary of a transformer, and of such character that the condenser-discharge will be in the form of an extremely rapid succession of impulses.”

This part is the essence of his genius, by charging in parallel and discharging in series, Tesla increases the voltage potential available, “I subdivide the condenser necessary for storing the energy required into integral parts or provide independent condensers, and employ means for charging said condensers in multiple and discharging them in series through the primary of the transformer.”

The items F F are self-induction coils placed beside the motor. Above these is the transformer, composed, essentially, of primaries G1 and G2 and a secondary H.

L L designate the mains, between which a circuit is formed, including the self-induction coils F F and the commutator. The switch d may be employed to bring either or both of the coils F F into this circuit.

The commutator is built up of insulated plates or segments, upon which the positive and negative brushes bear, and these plates may be considered as belonging to three sets or classes:

1 – the plates m for what may be considered as the positive brushes D D1 in one row, electrically connected together, and the corresponding plates n for what may similarly be considered as the negative brushes E E1 in the other row.

2 – the plates o, which lie in both rows, and hence are conveniently made in single pieces extending across the controller.

3 – the idle or spacing plates p q, which are interposed in each row between the other two sets.

The brush D of one set is connected with one main through the coils F, and each one of the brushes of the same set is connected to one of the terminals of the condensers M N, respectively. Similarly the brush E of the other set of brushes is connected to the opposite main and each of the brushes of said set to the opposite condenser terminals through the primary or strands of a primary G1 or G2.

In the position of the parts shown in which two positive and two negative brushes are shown, the brushes are bearing on plates m m and n n. Consequently the circuit through the coils F F is through the condensers in multiple, and assuming that energy has been stored in said coils, the condensers will thus be charged.

If now by the movement of the commutator plates or brushes the latter are shifted across the idle or spacing plates p q onto the long or cross-connected plates o two results follow:

1 – The mains are short-circuited through the coils F F, which therefore store energy, while the condensers are connected in series through the primary coils G0 or G1.

2 – The condensers being charged in parallel when the brushes are on plates m n and discharged in series when the brushes pass onto plates o.

Diagram 1 – I redrew the main patent for clarity

Diagram 2 – These are the basic 3 action as the brushes change the configuration.

Diagram 3 – The Commutator schematic

Diagram 4 – How the Commutator is set up in 3D at the end of the motor.

I hope this helps in the understanding of Tesla’s methods used to create high frequency and high voltages without transistors, diodes or tubes.

Image

Image

Image

Image

Tesla Coil Fun

September 30, 2011

I am currently designing and building a portable Tesla coil, so I put it in my carry-bag on my motorbike,  here are some pics. (more info to follow, soon)

Primary design

Tesla Coil Mount

Top View of base

Midi Size Tesla Coil